Wednesday, June 29, 2011

Bears on the Beach Cake


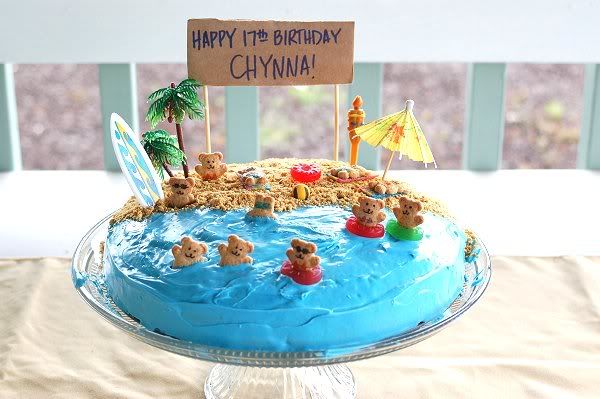
My little sister turned 17 years old today. I decided to make her a beach themed cake since it's summer and she's all about the beach, beach, beach (and Drivers Ed, eek!). I had made these bears on the beach cupcakes (which I think originally came from Bakerella) a few years ago and I told myself I'd never do it again. It took a ton of work and I wasn't too thrilled with my results back then. Since it was so long ago I decided to give it a shot again. And it was so much more enjoyable this time!


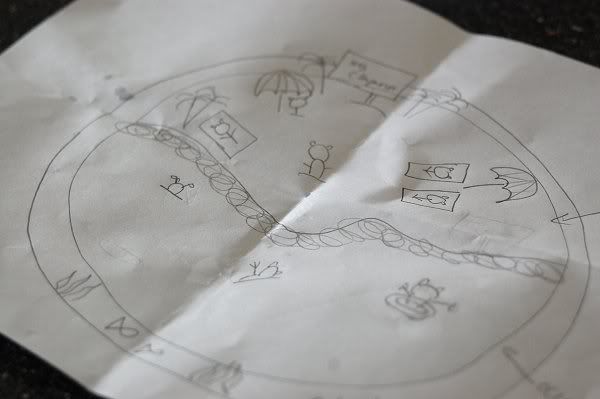
First I drew a sketch of what I wanted to do in my head. Sort of. I have zero artistic skills.


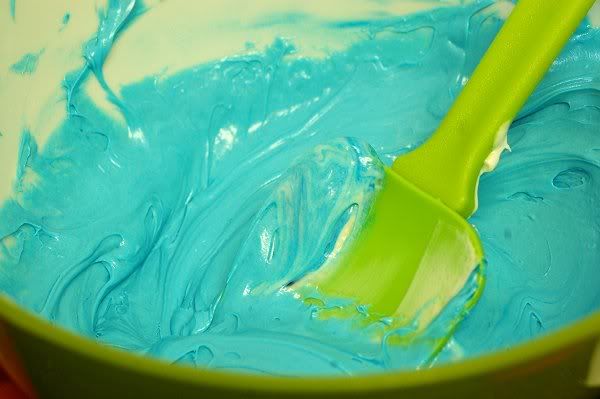
Then I made the water.


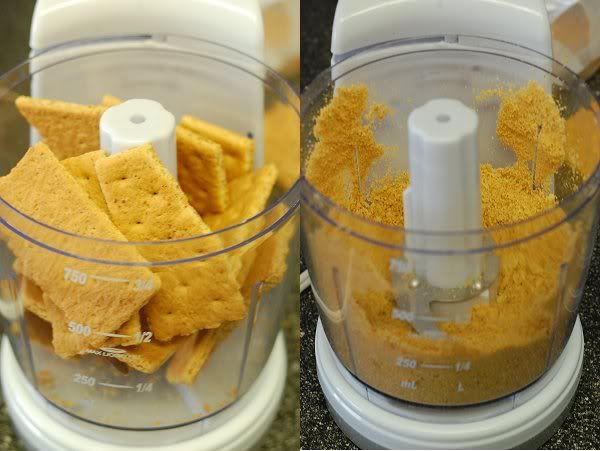
And the sand. (You can just smash up a bunch of graham crackers, but I finally got myself a generic little food processor and I find any excuse to use it. I shouldn't get as much joy out of using a food processor as I do.)


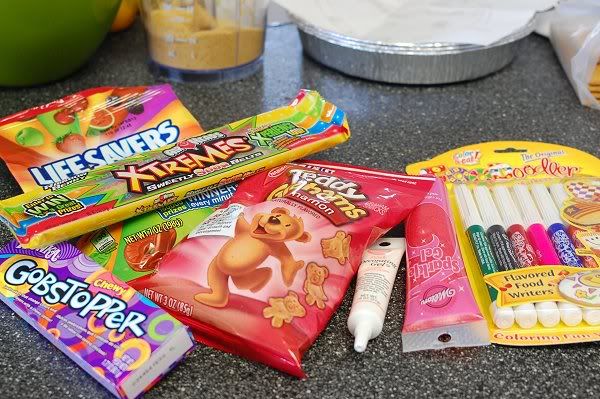
These are all the things I used. Teddy Grahams for the bears (obviously), Gummi Lifesavers for the inflatable tubes, Gobstoppers for the beach balls, Extreme Sour Belts for the beach towels, and edible pens to draw faces and bikinis. Also pictured is the Sparkle Gel I ended up not using.


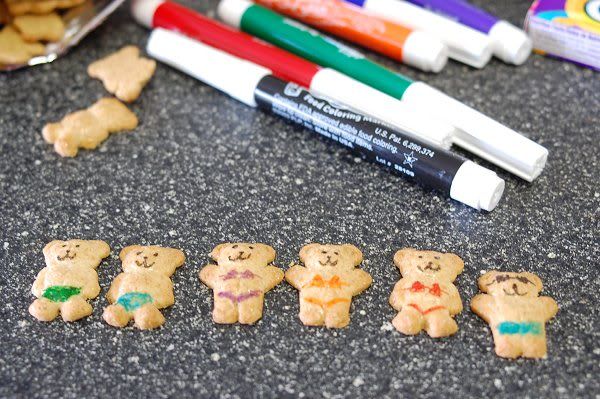
One of the reasons I didn't enjoy it the last time I made this cake was because I had a hell of a time drawing faces and bathing suits on the bears. This time I just used these edible pens and they worked out great!


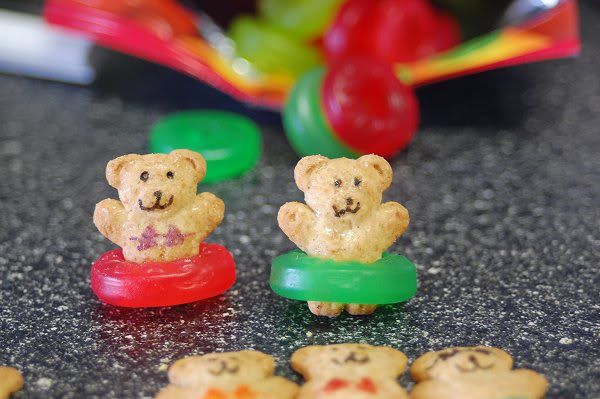
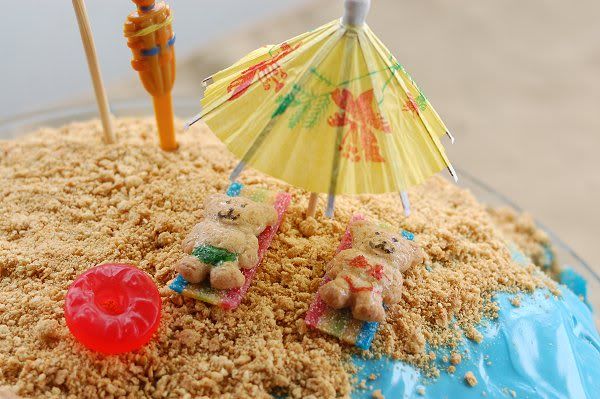
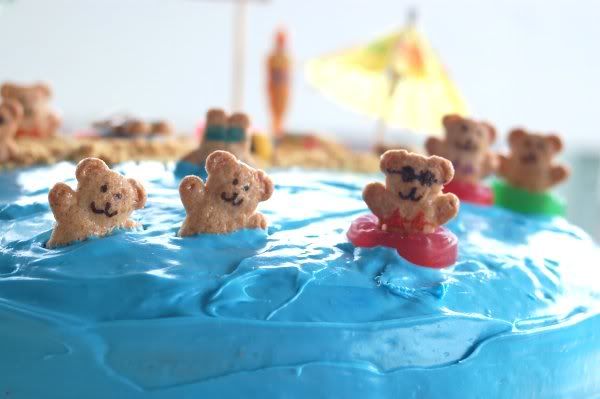
Some bears getting ready for a dip.


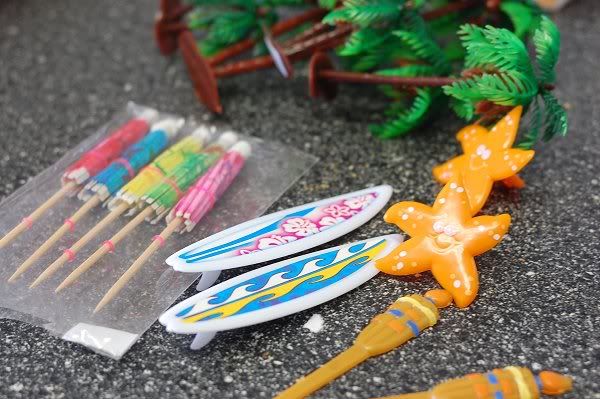
These are just some of the other decorations I had planned to use.


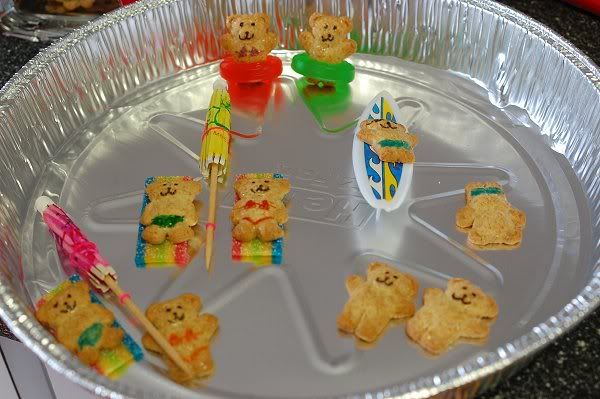
After all the bears were prepped I arranged them in the little clusters I wanted to put them on the cake.


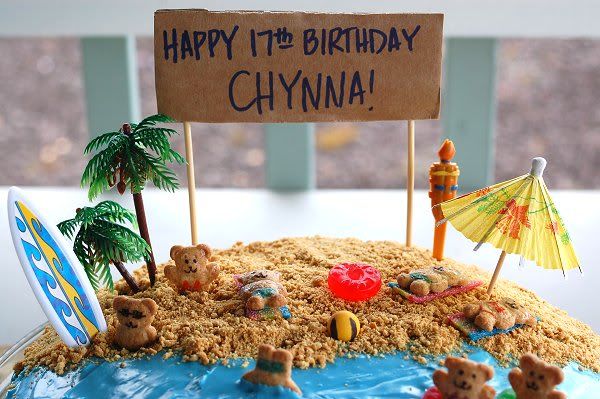
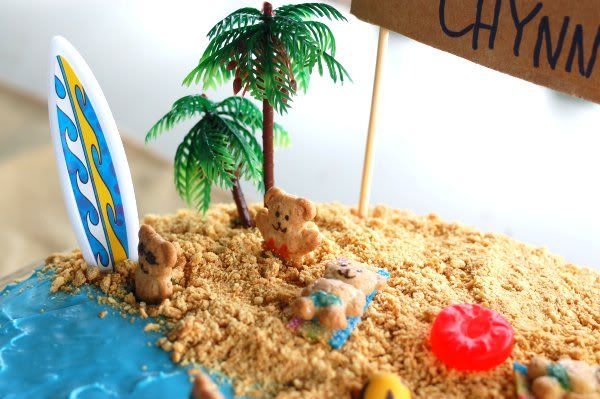
And it's done! The sign might throw it off a bit, but by this time I was walking circles around the house trying to figure out what I was going to use for the sign. Eventually I just grabbed some cardboard and a permanent marker and that's what we've got. I could have used fondant, but I didn't want to deal with the fondant in this humid Hawaii weather.


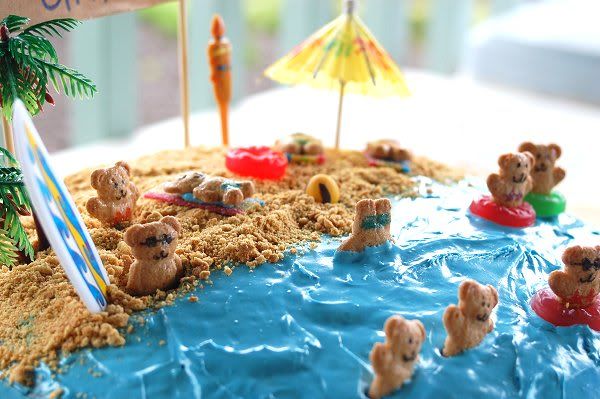
A bear couple lounging.


These are synchronized swimmers? Or two boys on a race to see who can get to the girl first?


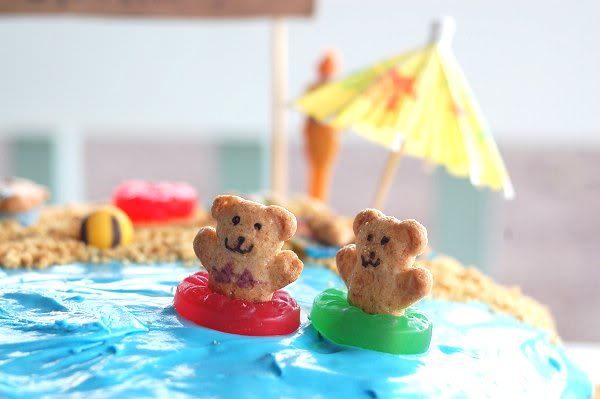
A couple inner tubing.


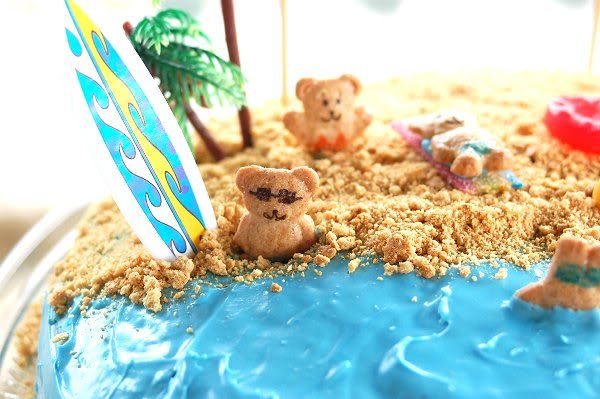
A cool surfer checking out the waves (next to his gigantic surfboard, lol).


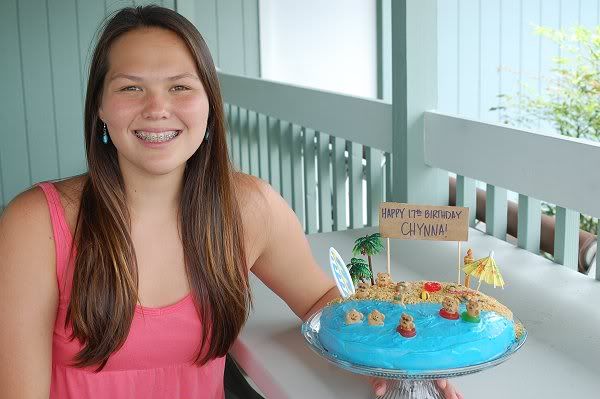
The birthday girl and her cake.

Wednesday, June 22, 2011

Stuffed Green Bell Peppers


Our bell pepper plant fired off a bunch of little peppers. The bf suggested I make stuffed peppers so I scoured the internet for something easy. After looking at about 20 recipes I settled on this one from Kalyn's Kitchen. I made a couple small changes and whipped these up after work today. The bf said the next time we made them he'd want more meat so you might want to up the amount of meat you put in it. He also said that it tastes like a supreme pizza. I halved the recipe posted below because we only had 7 really small peppers so the pictures might be a little misleading.


Here are our little oddly shaped home grown peppers.


Chop the tops off and save them.


Scoop out the insides of peppers and get out all the seeds and membrane. Dice up the tops of the peppers, the onion and the garlic.


Heat a little bit of olive oil in a pan and saute the peppers, onion, and garlic until soft, but not browned. Be sure to add salt and pepper.


Pretend I took a picture of browning the meat. After you saute the veggies, set them aside and cook your meat. I drained off the excess fat because I used beef. Once your meat is browned, add the veggies back into the pan along with oregano and more salt and pepper. Cook for another 2 - 3 minutes.


Add in the rice and Parmesan cheese and cook for an additional 1 - 2 minutes.


And your stuffing is done.


Stuff each of your peppers to the top. Make sure you pack it down nice and tight with a spoon. Bake at 375 degrees for 20 - 30 minutes. (Because these pepper were little I cooked them for only 20 minutes.)


After 20 - 30 minutes, remove from oven and top with mozzarella cheese.


Put them back in the oven for another 10 - 15 minutes until the mozzarella melts and turns golden.


Serve hot!

Stuffed Green Bell Peppers
Adapted from Kalyn's Kitchen

Ingredients:
4 large green bell peppers
1 cup long grain rice, cooked
1 lb ground beef
2 cloves garlic
1 small onion
salt and pepper to taste
1/2 teaspoon oregano
olive oil
1/2 cup grated Parmesan cheese
mozzarella cheese for topping

Directions:
1. Cut the tops off of your peppers and set aside. Remove the seeds and membrane from the inside of your peppers.
2. Remove the stems from the pepper tops and mince the tops. Also cut up 1 small onion and 2 cloves of garlic.
3. Heat a bit of olive oil over medium high heat and add your pepper tops, onion, and garlic, sprinkled with salt and pepper. Saute until the veggies get soft, but not brown. Remove and set aside.
4. Brown your beef. Drain the fat from the beef. Add the veggies back into the pan and sprinkle with more salt and pepper along with 1/2 teaspoon oregano. Saute for 2 - 3 minutes.
5. Add in the rice and Parmesan cheese. Stir and cook for another 1 - 2 minutes.
6. Stuff each pepper to the top, packing the stuffing tightly into the pepper.
7. Bake at 375 degrees F for 20 - 30 minutes.
8. Remove from oven after 20 - 30 minutes and top with mozzarella cheese. Bake for another 10 - 15 minutes until cheese is melted and golden. Serve hot.

Friday, June 17, 2011

Japanese Night + Sweet Potato Tempura Recipe


Ready for a cool story bro? My mom's boyfriend grew some string beans (that were used above in the tempura) in his yard. My boyfriend and I started a garden (or should I say I started the garden and gave up on it while he still tends to it and does all the work) a while ago. Every now and again I'll use something from it. Green onions in random meals, bell peppers in fajitas, various herbs in this and that, etc. I don't know why I find it so fascinating when we can grow our own things in our yards and then incorporate them into our meals. Most times we just go to the store and buy stuff, not even thinking about where it came from, how it grew, or what it took to get it onto our plates. It's always so exciting to me and once we move into our house in a few months I plan to have an even bigger garden with tomatoes, cucumbers, lettuce, everything.

Anyway, my mom's boyfriend brought some of the beans over and that's what sparked this whole themed dinner. He and my mom contemplated what to do with them and they decided to do some tempura. From left to right in the picture above we have sweet potato (recipe at the end of this post), carrots, the string beans, mushrooms, pumpkin, and shrimp. What I don't have pictured is the tempura bacon we experimented with. I had seen an episode of The Best Thing I Ever Ate on The Food Network one day and someone had picked bacon tempura. I thought it was so wrong that it had to be so right. It tasted like what it was, deep fried bacon. Definitely delicious and definitely something I will never do again, lol.


We also made sushi. Ahi, salmon, daikon, and tobiko (flying fish roe) all over sushi rice and wrapped in nori.


And last, to top it off, some miso soup.

I have to a admit that I don't like sushi. I don't like most Japanese food (I can hear my grandma in my head saying, "What kine Japanee you?!"). I didn't eat most of this, only the sweet potato and shrimp tempura, but the food was too pretty not to share. I saw that my mom was using a recipe for the sweet potato tempura so I decided to share that. It's basically the only thing (along with the miso soup, my mom making it like her grandmother used to) that was made from scratch. For the veggies and shrimp we just used a box tempura mix. This batter is sweeter and more dense than the batter you'd use for doing vegetable and shrimp tempura. I don't know how available purple sweet potato is outside of Hawaii, but you can definitely use yellow sweet potato if that's all you can find.


Sweet Potato Tempura

Ingredients:
3 sweet potatoes
about 2 inches of vegetable oil (sorry for not having the exact measurement, this is how we cook around here)
1 t. vanilla extract
1 t. salt
2 t. baking powder
2 cup flour
1 cup sugar
2 eggs
1/2 cup milk

Directions:
1. Boil your sweet potatoes until tender, slice into rounds.
2. Heat your oil over medium-high heat.
3. Stir all your tempura batter ingredients together. Dredge each piece of sweet potato in the batter, shaking off excess batter.
4. Drop several pieces into the hot oil. Let them cook until the batter turns brown on one side, about 3 minutes. This batter does take a little while to get brown.
5. Flip and cook until the other side browns.
6. Drain on paper towels to soak up any extra oil.

It is best eaten fresh, but can be kept over night in a zip loc bag or air tight container.