Sunday, September 11, 2011

Grilled Paprika Chicken Thighs


This is the most random, colorful, what-the-heck-are-we-gonna-make-for-dinner dinner. I had picked up this bag of potatoes at Costco last week because they were pretty colors and they caught my eye, lol. Ever since I bought them I've been thinking about what in the world I was going to do with them. I usually just roast potatoes, but I felt like such pretty potatoes deserved a special preparation. As you can see, I procrastinated and ran out of time to find a fun recipe and just ended up roasting them again. Just slice, drizzle with olive oil, salt, and pepper, and bake at 400 degrees for about 30 minutes.

I knew I was going to pair the potatoes with grilled chicken of some sort, but I wanted something other than just garlic salt and pepper, which is what I usually do when grilling chicken. I asked my family what I should do and someone yelled out paprika. So I did what I always do: GOOGLE. I found a recipe for Smoked Paprika Roasted Chicken and just changed it up a tiny bit to fit my boneless skinless thighs since I wasn't using a whole chicken. I have to admit that I was kind of scared of it at first because it was so red/orange. It ended up being a hit, though. It's both smokey, from the paprika, and sweet, from the honey. I will definitely add it to my last minute, super quick, super simple, always have everything on hand recipe box. I used thighs because that's what I had, but you can definitely use breasts as well.

Grilled Paprika Chicken Thighs
Adapted from Simply Recipes

Ingredients:
3 Tbsp smoked paprika
3 Tbsp honey
1 1/2 Tbsp lemon juice
3 teaspoons garlic salt (or 1 teaspoon salt plus 1 teaspoon garlic powder)
1/2 teaspoon pepper
2 lb. bag of boneless skinless chicken thighs (about 9 thighs)

Directions:
1. Mix all the ingredients together.
2. Rinse the chicken thighs and pat dry.
3. Massage the paprika mixture into the chicken, let it sit in the fridge for 1 - 3 hours.
4. Grill until chicken is no longer pink.

Friday, August 12, 2011

Chicken Stuffed with Golden Onions & Fontina


I've been struggling with dinner ideas lately. I just feel like I've made everything in my mental recipe book one too many times. I spent part of my afternoon on Google trying to find random recipes. I originally started out looking for something to make using ground turkey. That eventually led me to 
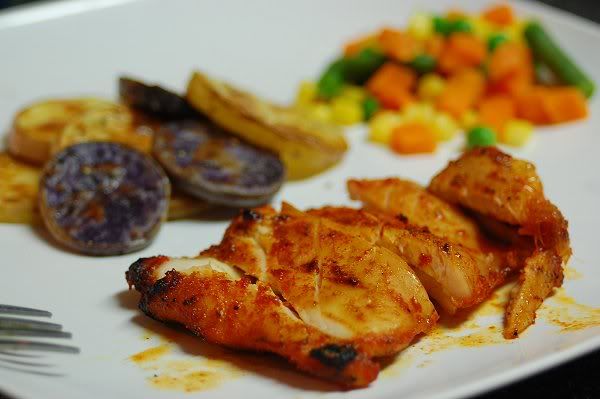
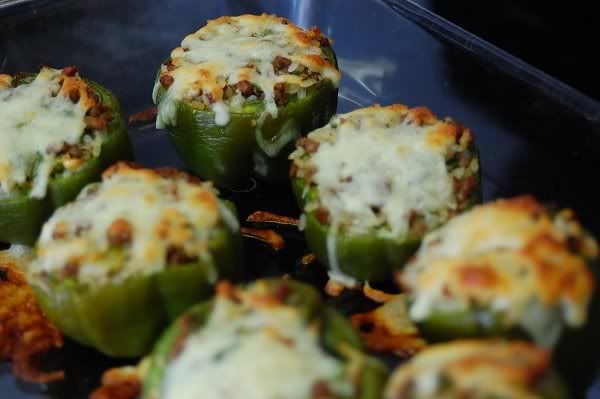
this recipe. It looks complicated, but it was really easy and everyone loved it, although I would have liked a little bit more cheese because some of it ended up oozing out the sides. I was also iffy about not seasoning the chicken before cooking it, but you really don't need to. The sweetness from the onions really help, along with the flavor that comes with the wine/chicken broth "gravy". The recipe calls for rosemary, which I had every intention to use since we have a ton of it in our garden, but I totally forgot about it until it was too late. I will definitely make this again, adding a bit more cheese and the forgotten rosemary.


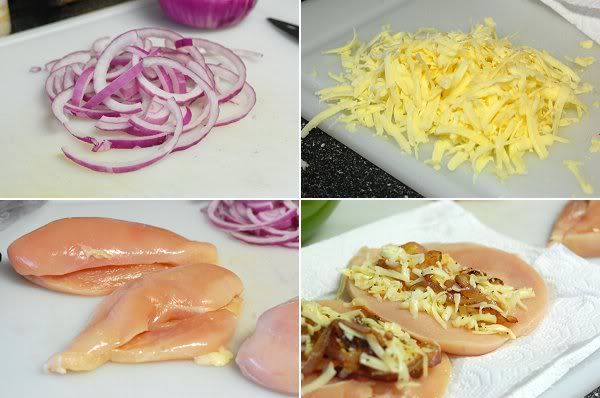
Thinly slice your onion and grate your cheese. Heat olive oil in a nonstick pan at medium-high heat and cook your union until golden brown, about 6 to 7 minutes. This is where you'd add the rosemary that I forgot. Set the onions aside to cool. While the onions are cooling, cut a slit in your chicken breasts making sure not to cut them completely in half. When the onions have cooled, mix in the cheese. Stuff the chicken breasts with the onion and cheese mixture.


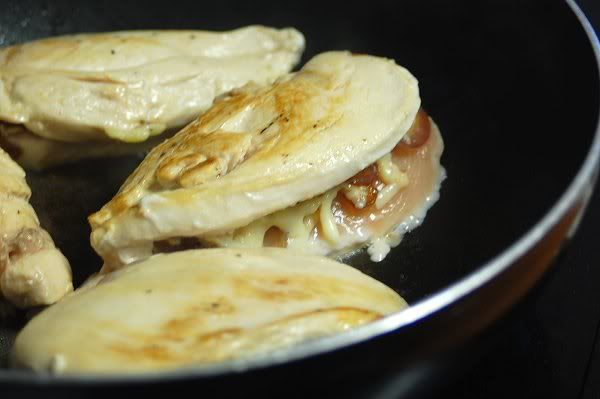
Heat more olive oil in the pan at medium-high heat and brown the chicken breasts on both sides, about 5 minutes per side (I should have definitely let my chicken brown a little longer). Once your chicken is browned, remove from the pan and tent with foil to keep warm. To the pan add the white wine (this is where you'd also add the rest of your rosemary) and let it reduce for about 2 minutes. In the meantime stir the chicken stock and flour until smooth. Reduce heat to low and add the broth/flour mixture, whisking until the sauce thickens, about 1 minute. Put the chicken back in the pan and coat with the sauce. Cover and let the chicken cook until it is no longer pink, about 2 to 4 minutes.


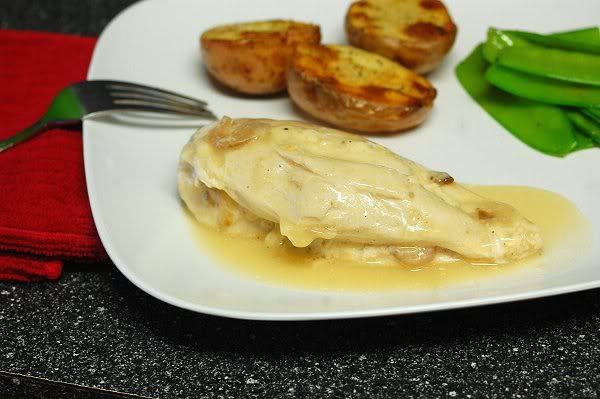
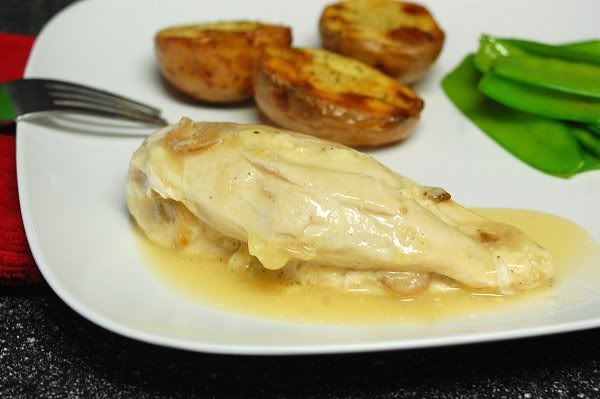
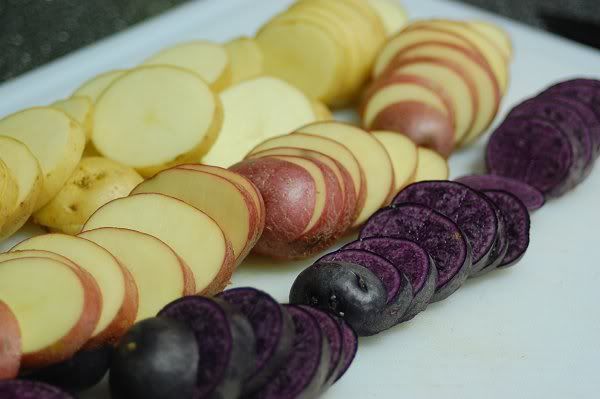
Serve the chicken topped with the sauce. I decided to pair it with some red potatoes that I roasted in the oven and some snow peas that I cooked in garlic infused olive oil with garlic salt and lots of freshly cracked black pepper.

Chicken Stuffed with Golden Onions & Fontina
From Family.com

Prep Time: 35 minutes
Ready in: 35 minutes
Yield: 4 servings
Ease of Prep: Moderate


Ingredients:
4 teaspoons extra-virgin olive oil , divided
1 1/2 cups thinly sliced red onion
2 teaspoons minced fresh rosemary , divided
1/8 teaspoon salt
Freshly ground pepper to taste
2/3 cup shredded fontina cheese , preferably aged
4 boneless, skinless chicken breasts (about 1 pound), trimmed of fat
1/2 cup white wine
1 cup reduced-sodium chicken broth
4 teaspoons all-purpose flour

Directions

1. Heat 2 teaspoons oil in a large nonstick skillet over medium-high heat. Add onion and 1 teaspoon rosemary; cook, stirring occasionally, until the onion is golden brown, 6 to 7 minutes. Season with salt and pepper. Let cool; stir in fontina.
2. Meanwhile, cut a horizontal slit along the thin, long edge of each chicken breast half, nearly through to the opposite side. Stuff each breast with 1/4 cup of the onion-cheese mixture.
3. Heat the remaining 2 teaspoons oil in the same skillet over medium-high heat. Add the chicken and cook until golden, about 5 minutes per side. Transfer to a plate and cover with foil to keep warm.
4. Add wine and the remaining 1 teaspoon rosemary to the pan. Cook over medium-high heat for 2 minutes. Whisk broth and flour in a bowl until smooth; add to the pan, reduce heat to low and whisk until the sauce thickens, about 1 minute. Return the chicken to the pan and coat with the sauce. Cook, covered, until the chicken is just cooked through, 2 to 4 minutes. Serve the chicken topped with the sauce.

Monday, August 1, 2011

Oatmeal Cranberry Cookies


No real story behind these cookies. I was browsing one of my favorite food blogs, Lovin' From the Oven, and she made a Dark Chocolate Chip Cranberry Oatmeal Cookie. I've recently discovered a love for cranberries (cranberry juice has always been a favorite of mine, I just never really enjoyed actually eating cranberries until recently) and decided I was going to make these. Except - are you ready for this? - I don't like chocolate chips. At all. I don't like them in my muffins, in my cupcakes, in my brownies, in my cookies, in anything. Am I the only one? I feel like I am. Anyway, I decided not to let the chocolate chips stop me and made the cookies with just cranberries instead. I love the sweetness and chewiness the cranberries bring to the cookies. This recipe made about 28 cookies and within 24 hours there are only 3 left.


Cream together one stick of room temperature butter, 1/2 cup sugar, and 1/2 cup brown sugar. Add 1 egg and 2 teaspoons of vanilla and mix until well combined. Stir in 1 cup flour, 1/4 teaspoon baking soda, 1/4 teaspoon baking powder, 1/4 teaspoon salt, and 1/4 teaspoon cinnamon. Add in 1 cup of oatmeal and about 3/4 cup of cranberries. (I started out with 1 cup of cranberries but then I had a little bit left in the bag and decided to just dump them all in.) Refrigerate dough for at least 2 hours.


Scoop balls of dough (I used a tablespoon) onto a cookie sheet and bake at 350 degrees for 10 - 12 minutes.


Let cookies cool on a wire rack.


Cranberry Oatmeal Cookies
Adapted from Lovin' From the Oven

Ingredients:
1 stick butter, room temperature
1/2 cup sugar
1/2 cup brown sugar
1 egg
2 teaspoons vanilla
1 cup flour
1/4 teaspoon baking soda
1/4 teaspoon baking powder
1/4 teaspoon salt
1/4 teaspoon cinnamon
1 cup oatmeal
3/4 cup cranberries

1. Cream together the butter and the sugars. Add in the egg and vanilla, mix until well combined. Stir in the flour, baking soda, baking powder, salt and cinnamon. Add in the oatmeal and cranberries.
2. Refrigerate dough for at least 2 hours.
3. Scoop spoonfuls of the dough onto a cookie sheet and bake at 350 degrees for 10 - 12 minutes.

Wednesday, July 20, 2011

Cinnamon Swirl Banana Muffins


Um, these are awesome. We had these grody bananas sitting on our counter for a while now and I had to do something with them. I had remember seeing this recipe on my friend Kim's blog, Kimmy's Kitchen, and knew that this is what I had to make with those bananas. I'm one of those people who tries to make every single bread into muffin form, so that's what I did. The recipe only makes 8 muffins, but I think that's just enough. I hate when I end up with over a dozen and they just end up going to waste. The bread is so moist and the cinnamon/sugar swirl works really well with the banana flavor. I can't wait to have one for breakfast tomorrow...if there are any left.

Cinnamon Swirl Banana Muffins
Adapted from Kimmy's Kitchen

MAKES ABOUT 8 MUFFINS

Ingredients for bread:
2 over-ripe bananas, mashed
1/3 cup melted butter
3/4 cup sugar
1 egg, beaten
1 tsp vanilla
1 tsp baking soda
1 1/2 cups flour
dash of salt

Ingredients for cinnamon/sugar swirl:
1/3 cup sugar
1 Tbs cinnamon

Directions:
1. Mash your bananas. Add in the butter, sugar, egg, and vanilla; stir to combine.
2. Add baking soda, flour, and salt; stir to combine.
3. Combine the cinnamon and sugar in a separate bowl for the swirl.
4. Line your cupcake pan with liners. Scoop banana batter into the bottom of the cupcake liner, about 1/4 of the way up. Sprinkle a little of the cinnamon/sugar. Spoon another scoop of banana batter on top and sprinkle with more cinnamon/sugar.
5. Bake at 350 degrees for about 20 minutes.

Sunday, July 10, 2011

Lindsay's Pumpkin Bread


Lindsay from You Are The Roots gave me this pumpkin bread recipe a few years ago and I've made it every Thanksgiving since. I'm well aware that it isn't Thanksgiving yet, but the other night our fridge and freezer were bare and I was scouring the cabinets for something to make for dinner. I didn't find anything dinner-worthy, but I did find a can of pumpkin and decided to make pumpkin bread. I am not a fan of pumpkin in any other way besides this bread. It's so moist and delicious and really simple to make. Everyone loves it (my sister was sitting there staring at it when it came out of the oven, she couldn't wait for me to cut into it). I really suggested trying it out, even when it isn't technically "pumpkin season".


Mix the pumpkin, eggs, oil, and cold water.


Sift the flour, baking soda, cinnamon, salt, nutmeg, and all spice.


Mix the dry ingredients into the wet ingredients. I do it in 3 batches. This is where you'd add your walnuts if you want.

Pretend I wasn't so excited to just get it into the oven and that I took a picture of two greased loaf pans filled with the batter. Bake at 350 for 60 - 65 minutes.


I definitely over-filled these. If using the smaller disposable aluminum pans like I did, you should get 3 loaves. I did two and ended up having to bake them for [what felt like] 7 years. I also made them into muffins one year and ended up with 41 of them!

Lindsay's Pumpkin Bread

Ingredients:
1 15oz can pumpkin
4 eggs
1 cup oil
2/3 cup cold water
3 cups sugar
3 1/2 cups flour
2 teaspoons baking soda
1 1/2 teaspoons cinnamon
1 1/2 teaspoons salt
1 teaspoon nutmeg
1 teaspoon all spice
1 cup chopped walnuts (optional)

Directions:
1. Preheat oven to 350.
2. Mix together pumpkin, eggs, oil, and cold water.
3. Sift together dry ingredients.
4. Mix dry ingredients with pumpkin mixture. (Opt: add chopped walnuts if desired)
5. Pour into 2 greased loaf pans.
6. Bake at 350 for 60 - 65 minutes. (If using smaller loaf pans it will take about 10 - 15 mins less. Just keep checking.)

Wednesday, June 29, 2011

Bears on the Beach Cake


My little sister turned 17 years old today. I decided to make her a beach themed cake since it's summer and she's all about the beach, beach, beach (and Drivers Ed, eek!). I had made these bears on the beach cupcakes (which I think originally came from Bakerella) a few years ago and I told myself I'd never do it again. It took a ton of work and I wasn't too thrilled with my results back then. Since it was so long ago I decided to give it a shot again. And it was so much more enjoyable this time!


First I drew a sketch of what I wanted to do in my head. Sort of. I have zero artistic skills.


Then I made the water.


And the sand. (You can just smash up a bunch of graham crackers, but I finally got myself a generic little food processor and I find any excuse to use it. I shouldn't get as much joy out of using a food processor as I do.)


These are all the things I used. Teddy Grahams for the bears (obviously), Gummi Lifesavers for the inflatable tubes, Gobstoppers for the beach balls, Extreme Sour Belts for the beach towels, and edible pens to draw faces and bikinis. Also pictured is the Sparkle Gel I ended up not using.


One of the reasons I didn't enjoy it the last time I made this cake was because I had a hell of a time drawing faces and bathing suits on the bears. This time I just used these edible pens and they worked out great!


Some bears getting ready for a dip.


These are just some of the other decorations I had planned to use.


After all the bears were prepped I arranged them in the little clusters I wanted to put them on the cake.


And it's done! The sign might throw it off a bit, but by this time I was walking circles around the house trying to figure out what I was going to use for the sign. Eventually I just grabbed some cardboard and a permanent marker and that's what we've got. I could have used fondant, but I didn't want to deal with the fondant in this humid Hawaii weather.


A bear couple lounging.


These are synchronized swimmers? Or two boys on a race to see who can get to the girl first?


A couple inner tubing.


A cool surfer checking out the waves (next to his gigantic surfboard, lol).


The birthday girl and her cake.

Wednesday, June 22, 2011

Stuffed Green Bell Peppers


Our bell pepper plant fired off a bunch of little peppers. The bf suggested I make stuffed peppers so I scoured the internet for something easy. After looking at about 20 recipes I settled on this one from Kalyn's Kitchen. I made a couple small changes and whipped these up after work today. The bf said the next time we made them he'd want more meat so you might want to up the amount of meat you put in it. He also said that it tastes like a supreme pizza. I halved the recipe posted below because we only had 7 really small peppers so the pictures might be a little misleading.


Here are our little oddly shaped home grown peppers.


Chop the tops off and save them.


Scoop out the insides of peppers and get out all the seeds and membrane. Dice up the tops of the peppers, the onion and the garlic.


Heat a little bit of olive oil in a pan and saute the peppers, onion, and garlic until soft, but not browned. Be sure to add salt and pepper.


Pretend I took a picture of browning the meat. After you saute the veggies, set them aside and cook your meat. I drained off the excess fat because I used beef. Once your meat is browned, add the veggies back into the pan along with oregano and more salt and pepper. Cook for another 2 - 3 minutes.


Add in the rice and Parmesan cheese and cook for an additional 1 - 2 minutes.


And your stuffing is done.


Stuff each of your peppers to the top. Make sure you pack it down nice and tight with a spoon. Bake at 375 degrees for 20 - 30 minutes. (Because these pepper were little I cooked them for only 20 minutes.)


After 20 - 30 minutes, remove from oven and top with mozzarella cheese.


Put them back in the oven for another 10 - 15 minutes until the mozzarella melts and turns golden.


Serve hot!

Stuffed Green Bell Peppers
Adapted from Kalyn's Kitchen

Ingredients:
4 large green bell peppers
1 cup long grain rice, cooked
1 lb ground beef
2 cloves garlic
1 small onion
salt and pepper to taste
1/2 teaspoon oregano
olive oil
1/2 cup grated Parmesan cheese
mozzarella cheese for topping

Directions:
1. Cut the tops off of your peppers and set aside. Remove the seeds and membrane from the inside of your peppers.
2. Remove the stems from the pepper tops and mince the tops. Also cut up 1 small onion and 2 cloves of garlic.
3. Heat a bit of olive oil over medium high heat and add your pepper tops, onion, and garlic, sprinkled with salt and pepper. Saute until the veggies get soft, but not brown. Remove and set aside.
4. Brown your beef. Drain the fat from the beef. Add the veggies back into the pan and sprinkle with more salt and pepper along with 1/2 teaspoon oregano. Saute for 2 - 3 minutes.
5. Add in the rice and Parmesan cheese. Stir and cook for another 1 - 2 minutes.
6. Stuff each pepper to the top, packing the stuffing tightly into the pepper.
7. Bake at 375 degrees F for 20 - 30 minutes.
8. Remove from oven after 20 - 30 minutes and top with mozzarella cheese. Bake for another 10 - 15 minutes until cheese is melted and golden. Serve hot.